SageMaker: save your conda environments after the machine restarts
Are you creating conda environments and installing packages from scratch every time you start a SageMaker machine?
It’s annoying. And it always happens when you are working on something else instead of improving your ML infrastructure setup.
This guide will help you save your conda environments after your SageMaker machine stops. They won’t disappear anymore.
The guide:
- Has a super simple setup (just lifecycle scripts). After reading this guide, you can have it set up in 3 minutes!
- Makes sure all your new conda environments are saved.
- Set them up so they are automatically recognized by Jupyter.
- Does not require any additional infrastructure.
- Is composable with other SageMaker scripts.
Setting up the the lifecycle configuration
We’ll create a new lifecycle configuration (or edit the one your instances already use). Whenever an instance with a lifecycle configuration starts, it runs a set of scripts as the root user.
As part of that lifecycle configuration, we’ll inject a script that makes sure all your new conda environments are installed in such a way that they are not lost after the machine restarts.
I’ll present two ways to do that, by using UI and aws CLI. I always do it through CLI because it’s faster, but if you do not have your AWS credentials set up for yet, the UI will do the job.
UI setup
- In AWS console, go to SageMaker -> Lifecycle configurations
- Create a new lifecycle configuration. If your machines already use some lifecycle configuration, just open that one.
- Under Scripts section make sure “Start notebook” tab is opened
- Paste this code at the end
#!/usr/bin/env bash
set -e

# set up persisted conda environments
curl https://raw.githubusercontent.com/mariokostelac/sagemaker-setup/master/scripts/save-conda-environments/on-start.sh | bash
- Save the configuration
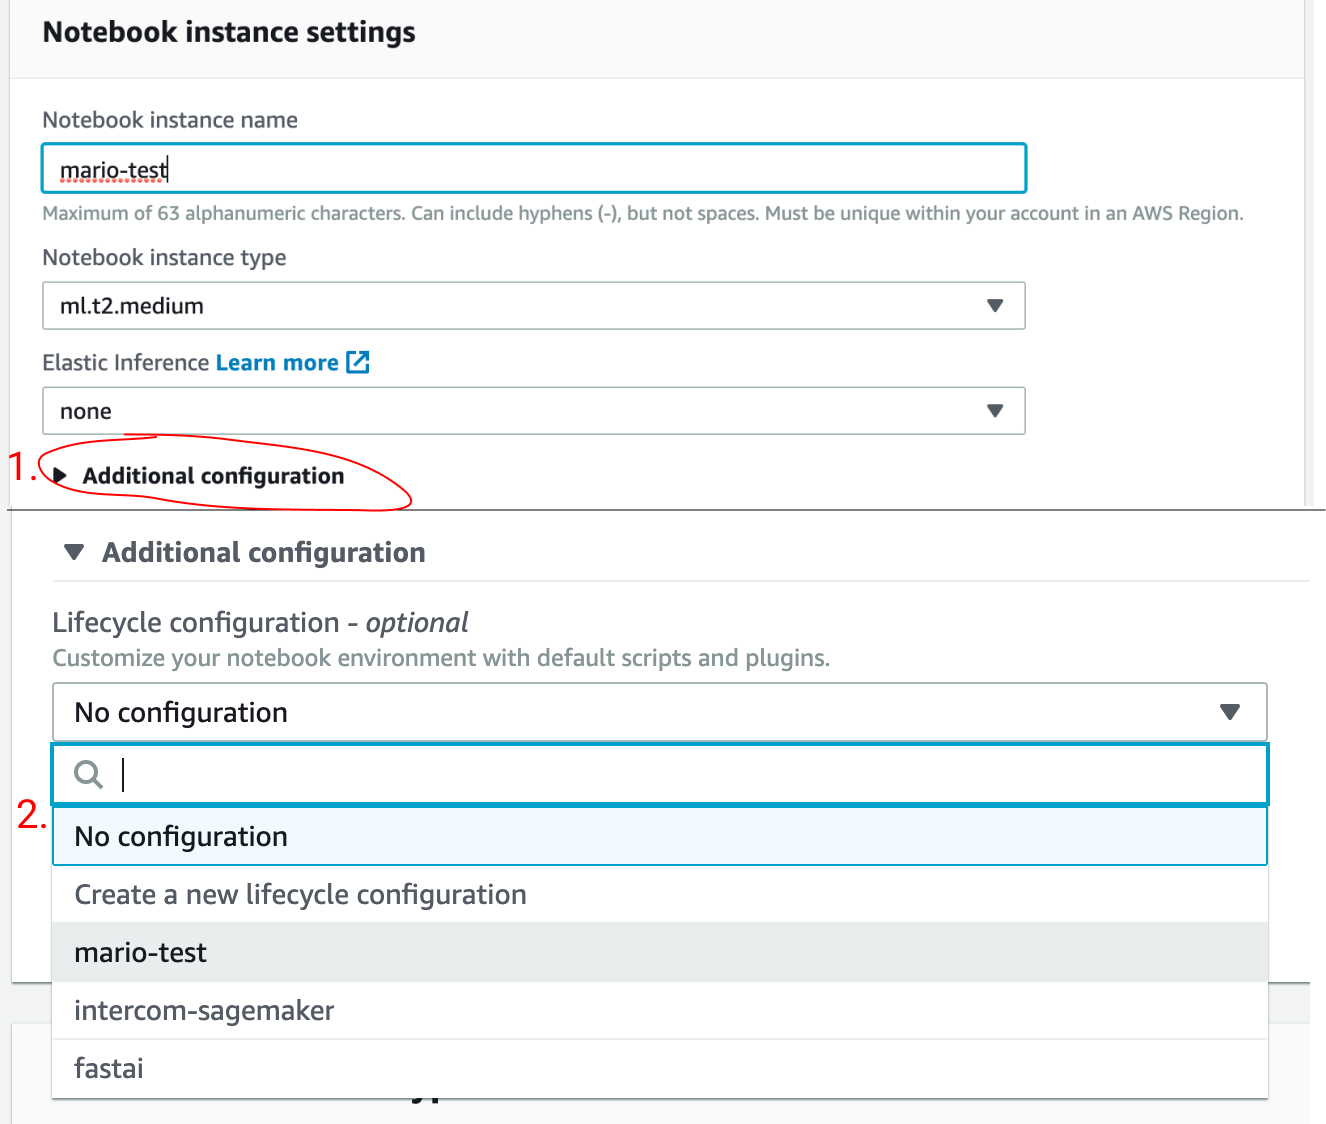
- If you’re creating a new instance, make sure you create it with that lifecycle configuration (shown on picture below).

- If you’ve already have an instance, stop the instance, click edit, click Additional configuration and choose the lifecycle configuration you’ve created.
That’s it. Next time your machine starts, all the conda environments you create won’t be lost after you restart the machine (or it turns off after it’s inactive).
CLI setup
CLI setup is less involved. You can paste and run the code line by line (on your machine).
Let’s create a new lifecycle configuration. If you already have one, just comment on the line that creates it. The rest is going to be the same.
# fill this with your name if you want to update the existing one
CONFIGURATION_NAME="better-sagemaker"

# create new lifecycle configuration
aws sagemaker create-notebook-instance-lifecycle-config \
    --notebook-instance-lifecycle-config-name "$CONFIGURATION_NAME" \
    --on-start Content="$((echo "#!/usr/bin/env bash")| base64)" \
    --on-create Content="$((echo "#!/usr/bin/env bash")| base64)"

# save the existing on-start script into on-start.sh
aws sagemaker describe-notebook-instance-lifecycle-config --notebook-instance-lifecycle-config-name "$CONFIGURATION_NAME" | jq '.OnStart[0].Content'  | tr -d '"' | base64 --decode > on-start.sh

# add the code to persist conda environments
echo '' >> on-start.sh
echo '# set up persisted conda environments' >> on-start.sh
echo 'curl https://raw.githubusercontent.com/mariokostelac/sagemaker-setup/master/scripts/save-conda-environments/on-start.sh | bash' >> on-start.sh

# update the lifecycle configuration config with updated on-start.sh script
aws sagemaker update-notebook-instance-lifecycle-config \
    --notebook-instance-lifecycle-config-name "$CONFIGURATION_NAME" \
    --on-start Content="$((cat on-start.sh)| base64)"
When creating a new machine, just pass “better-sagemaker” as a lifecycle configuration name. If you’re creating it from CLI, it will look something like this:
INSTANCE_NAME="instance-name"
INSTANCE_TYPE="ml.t2.medium"
ROLE_ARN="some_role"
CONFIGURATION_NAME=${CONFIGURATION_NAME:-better-sagemaker}

aws sagemaker create-notebook-instance \
    --notebook-instance-name "${INSTANCE_NAME}" \
    --instance-type "${INSTANCE_TYPE}" \
    --role-arn "$ROLE_ARN" \
    --lifecycle-config-name "${CONFIGURATION_NAME}"
Existing conda environments (provided by Amazon)
It’s important to remember that this will not save environments that come by default with your SageMaker machine. If you install an additional package in one of these environments (like mxnet/pytorch/tensorflow), they will not be saved after your machine shuts down.
There are several problems with how these environments are set up (e.g. using OS dependencies instead of installing them through conda) and it’s often more trouble than the value you get.
If you really need to use them and need to add additional packages, I suggest cloning them first. If you clone them after you set up your machine with this guide, these cloned ones will be saved.
Here’s how you can clone an environment. Open a terminal on that machine and runconda create --name tensorflow_p36_clone --clone tensorflow_p36.
How does the script actually work?
It creates a ~/SageMaker/.persisted_conda and alters the conda configuration to load environments from that directory too. And it gives that directory the highest priority.
Since new environments are now located in ~/SageMaker, which is saved between restarts, your conda environments do not disappear.
Troubleshooting
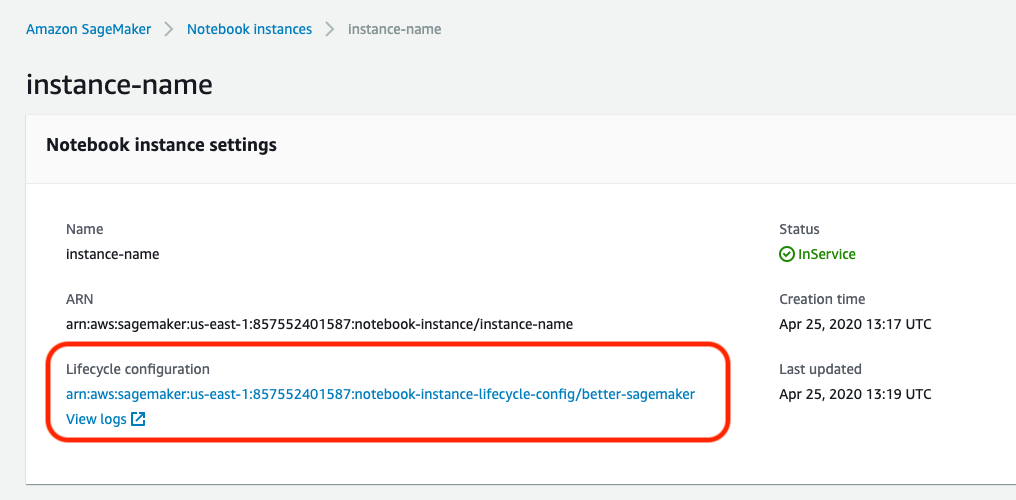
What lifecycle configuration is my SageMaker machine using?
If you open AWS Console and find your SageMaker machine, you will see a screen like this. This will show you the current lifecycle configuration name (add picture).

I can’t change the lifecycle configuration my machine is using
In order to change the lifecycle configuration, your machine must be in “stopped” state.
My conda environment is not appearing in Jupyter
If you want the new conda environment to be recognised by Jupyter, make sure to install ipykernel in it.
The safest way is to create an environment and install it straight away. Like conda env create -n testenv python=3.6 ipykernel.
If you already have some conda environment, install it with pip install ipykernel.
Once you do that, keep in mind that it can take up to a few minutes for your new environment to appear in Jupyter. If it does not appear after 5 minutes, something went wrong.
More about the same topic
-
How to make startup scripts for Jupyter kernels reliable?
-
SageMaker: install Jupyter extensions in restart-proof way
-
SageMaker: SSH to notebook instances
-
SageMaker: automatically stop your instances when idle